
Shooting in low light
At night every stop counts, and you have to choose what to give up: depth of field, sharpness or clean shadows. Learn to hold still, open up, raise ISO, use Night mode, and bounce the flash instead of firing it at faces.
THE ORDER OF MOVES
Open up, slow down, then raise ISO
On a camera, find light in this order. 1. Aperture: open it as wide as it goes, for example f/1.8. 2. Shutter: use the slowest speed you can hold steady, or that the subject allows; a sleeping cat can take a slower shutter than a dancing friend. 3. ISO: raise it for whatever is still missing. When you have to choose, take noise over blur: a slightly grainy sharp photo is fine, a blurred one isn't. On a phone the aperture is fixed, and the phone makes the shutter and ISO choice for you, unless you use a Pro or Manual mode.
Reza shoots his family at dinner with his camera: f/1.8, then 1/60 because people move while they talk, then ISO climbs to 1600 to cover the rest. A bit of grain, but every face is sharp.
Check yourself
In low light, a little noise usually ruins a photo more than a little blur, so it's better to keep ISO low and slow the shutter right down.
Show the answer
False
False. It's the other way round. Some grain rarely spoils a picture, but blur from shake or movement usually does, and it can't be fixed later. Accept some noise to keep the shutter fast enough.
Steady the camera
- Lean it on something
A tripod is best, but a wall, a table, a railing or a bag on a bench all work.
- Hold it properly
Two hands, elbows tucked into your body, breathe out slowly as you press.
- Use the self-timer
A 2-second timer means your finger pressing the button doesn't shake the shot.
- Know what stabilisation can do
Stabilisation in the lens, body or phone steadies your hands for still scenes. It does nothing for a person who moves.
Check yourself
Nima's camera is set to f/2, 1/250 and ISO 100, and indoors the picture comes out 4 stops too dark. How can he fix it without changing the shutter speed?
- Raise ISO to 400
- Raise ISO to 1600
- Close the aperture to f/8
- Raise ISO to 800 and close the aperture to f/4
Show the answer
Raise ISO to 1600
Right. Each doubling is one stop: 100 to 200 to 400 to 800 to 1600 is four doublings, so four stops brighter.
Step through it
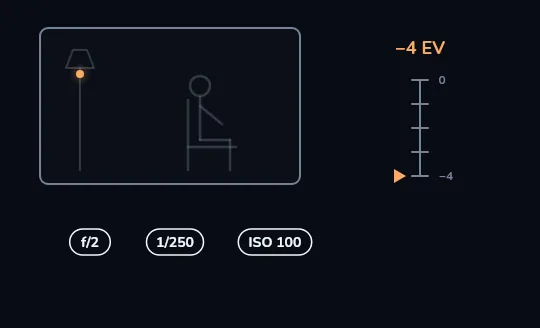
Daylight settings: 4 stops too dark A dim room with a lamp and a seated figure, shot at f/2, 1/250 and ISO 100. The frame is almost black and the meter reads −4 EV in orange: settings that work outdoors leave this room about four stops too dark.
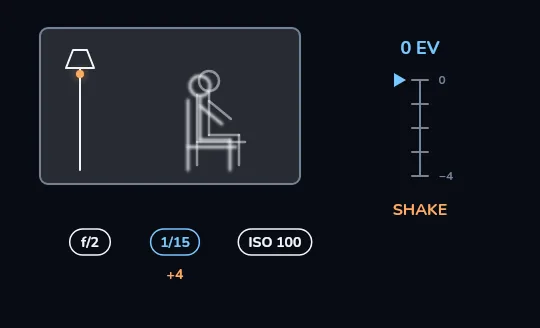
Shutter to 1/15: bright, but shaken The shutter slows from 1/250 to 1/15, four stops more light, and the meter reaches 0 EV. The room is bright now, but the seated figure is doubled and smeared, marked SHAKE: the long exposure caught every movement of hands and subject.
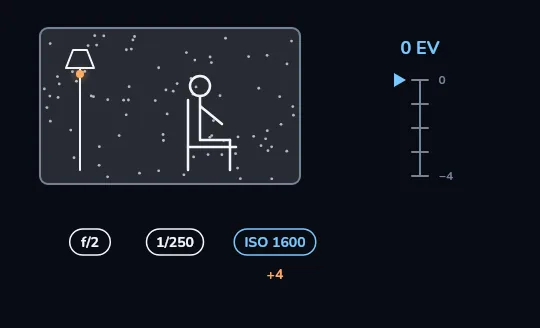
ISO to 1600 instead: sharp, but grainy The shutter goes back to 1/250 and ISO rises from 100 to 1600 instead, the same four stops. The figure is sharp again and the meter still reads 0 EV, but the whole frame is covered in speckles: raising ISO four stops keeps it sharp but adds grain.
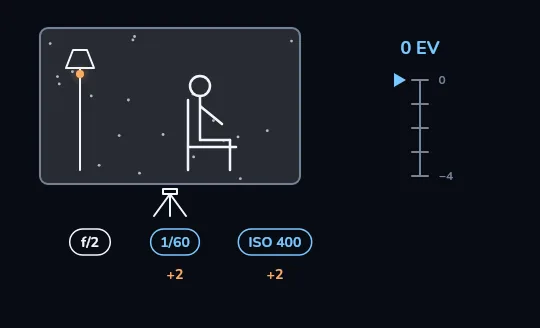
Split it: 1/60 and ISO 400, braced Now the four stops are split: shutter 1/60 for two and ISO 400 for the other two, with a tripod under the frame. The meter reads 0 EV and the picture is bright and sharp, with only a light sprinkle of grain. A little of each, with the camera braced, is usually the cleanest result.
Check yourself
In the last frame, how do 1/60 and ISO 400 together make up the four stops the room needed?
- 1/250 to 1/60 is one stop, ISO 100 to 400 is three
- 1/250 to 1/60 is two stops, and ISO 100 to 400 is two more
- 1/250 to 1/60 is four stops on its own, ISO adds nothing
- They don't; the picture is still two stops too dark
Show the answer
1/250 to 1/60 is two stops, and ISO 100 to 400 is two more
Right. 1/250 to 1/125 to 1/60 is two halvings of speed, two stops. ISO 100 to 200 to 400 is two doublings, two more. Four in total, so the meter reads 0 EV.
NIGHT MODE
What your phone's Night mode actually does
Night mode captures several frames over one to several seconds and merges them. Averaging many frames cancels out much of the noise and brightens the scene, and the phone lines the frames up to hide small hand movements. So hold still until it finishes, and ask people in the shot to hold still too. Propped on something or on a tripod, many phones allow a longer capture. It struggles with moving subjects, which can come out smeared or ghosted.
Mina photographs a lit-up bridge at night. The phone shows 3 seconds; she leans her elbows on the railing and waits for the circle to finish. The river is smooth, the lights crisp, and the sky clean.
Direct flash or bounced light?
Direct flash
The built-in flash fired straight at faces: flat, harsh light, shiny skin, red eyes, and a black background because the flash only reaches the first few metres.
Better options
Move closer to a lamp or turn on more room lights. On a camera whose flash tilts, bounce it off a white ceiling or wall: the whole ceiling becomes a big, soft light source, and the room behind stays visible.
Check yourself
What does a phone's Night mode actually do when Sara presses the button?
- It fires a hidden infrared flash
- It captures several frames over a second or more and combines them to cut noise and brighten the scene
- It simply raises ISO as high as it can go
- It switches to a special night lens
Show the answer
It captures several frames over a second or more and combines them to cut noise and brighten the scene
Right. Several frames merged into one: less noise, more brightness. That's why she has to hold still until it finishes.
More night habits
- Keep night scenes dark enough to look like night; don't brighten them into daytime.
- Bright lamps and neon signs clip easily: tap on the bright area or use −EV to keep their colour.
- Don't use digital zoom in the dark; it magnifies the noise. Walk closer.
- City at blue hour or light trails: tripod, ISO 100, a smaller aperture like f/8, and about 5 to 30 seconds.
- Auto flash at a concert can't light a stage from the crowd; turn it off.
Check yourself
Match each night-time problem to its fix
Show the answer
- A friend at dinner looks flat, shiny and red-eyed → Turn on more room lights or bounce the flash off the ceiling
- A neon sign is a white blob → Tap on the sign or use −EV
- A distant face is a mush of grain → Walk closer instead of zooming digitally
- A Night mode shot of a still street is smeared → Brace the phone and hold still until it finishes
Lesson recap
- Indoors at night can be something like 6 to 8 stops darker than open sun; the camera is always short of light.
- On a camera: open the aperture, use the slowest shutter you can hold or the subject allows, then raise ISO.
- Take noise over blur, and splitting the stops, such as 1/60 and ISO 400, is often cleanest.
- Brace the camera and use a 2-second timer; Night mode merges several frames, so hold still.
- Skip direct flash at faces: use room light or bounce the flash off a ceiling.