
Portraits of people you know
A flattering portrait is mostly distance, light and focus on the eyes. Learn why a phone held too close makes noses bigger, where to put the light, and how to help someone relax in front of the lens.
DISTANCE
Distance, not the lens, changes the face
From about 30 cm away, a typical selfie distance, the tip of the nose is noticeably closer to the camera than the ears. Things closer to the camera look bigger, so the nose grows, the face looks stretched, and the ears slip out of view. This is perspective distortion, and it comes from the distance. Step back to about 1.5 to 2 m and the difference in distance between nose and ears becomes tiny, so the face looks the way it does in person.
Mina takes a selfie at arm's length, then asks Reza to take one of her from two metres away with the phone's 2x lens. Same face, but in the second her nose is her real size.
Check yourself
Why does a close-up phone selfie make Nima's nose look larger than it is?
- Phone lenses are made to enlarge the centre of the picture
- The camera is so close that his nose is much nearer to it than the rest of his face
- Selfie cameras have lower resolution
- The screen stretches the image
Show the answer
The camera is so close that his nose is much nearer to it than the rest of his face
Right. At about 30 cm, the nose is a good deal closer to the lens than the ears, and closer things look bigger. Step back and the effect fades.
THEN FILL THE FRAME
Step back, then use a longer lens
Once you're 1.5 to 2 m away, the face is small in a 1x frame, so use a longer lens to fill it. On a phone, switch to the real 2x or 3x lens, or use Portrait mode, which usually picks that lens for you. On a camera, a focal length of about 50 to 135 mm equivalent works well, and 85 mm is the classic portrait length. Avoid pinching to zoom on the 1x lens when there's a real telephoto lens, and keep the 0.5x ultra-wide away from close faces: it's the most stretching of all.
Sara wants a head-and-shoulders shot of her dad. Instead of holding the phone half a metre from his face on 1x, she steps back to about 1.5 m and taps 2x. The frame is just as full, and he looks like himself.
Check yourself
Reza wants a natural-looking head-and-shoulders photo of his mum with his phone. What's the best approach?
- Stand close and use the 0.5x lens to fit everything in
- Stand about 30 cm away on 1x
- Step back to about 1.5 to 2 m and use the 2x or 3x lens, or Portrait mode
- Stand far away on 1x and crop later
Show the answer
Step back to about 1.5 to 2 m and use the 2x or 3x lens, or Portrait mode
Right. The distance keeps her features in natural proportion, and the longer lens fills the frame without cropping away quality.
Step through it
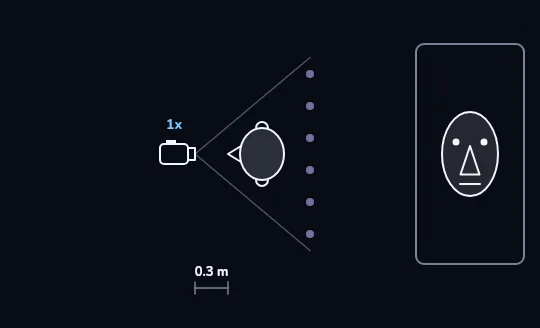
From 0.3 m on 1x, the nose grows Seen from above, the camera is just 0.3 m from the face on the 1x lens, with a wide field of view. In the result on the right, the nose looks noticeably enlarged and the ears have disappeared: from about 30 centimetres the nose is much closer than the ears, so it looks bigger.
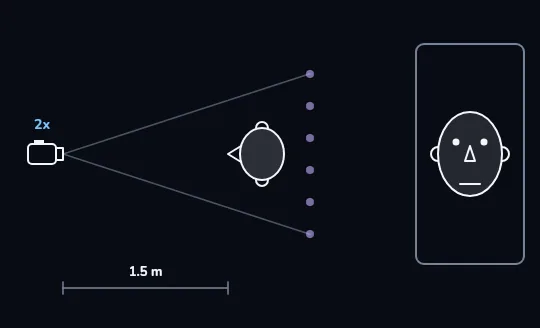
Back to 1.5 m on 2x: natural proportions The camera moves back to 1.5 m and switches to the 2x lens, so its field of view narrows. The face still fills the frame, but now the nose is its real size and both ears show again: step back and use the 2x lens for natural proportions.
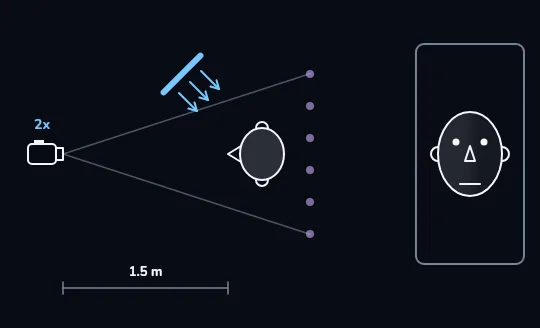
A window at 45 degrees shapes the face A window appears to one side, angled at about 45 degrees to the face, with its light falling across it. In the result, the far side of the face is now softly shaded, which gives it shape. Turn your subject about 45 degrees to a window for soft, flattering light.
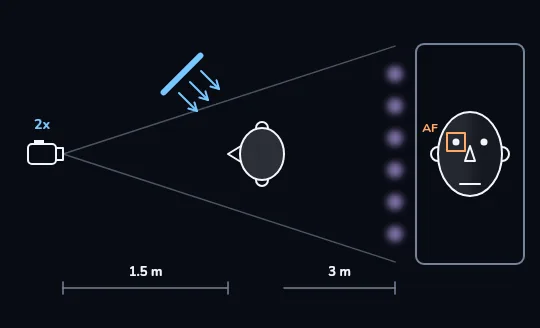
Focus on the nearer eye, push the background back An AF square now sits on the nearer eye in the result. In the view from above, the background has moved back to 3 m behind the person and turned into soft blurred dots. Focus on the nearest eye, and put space between the person and the background to soften it.
Check yourself
As in the last frame, where should the focus land in a portrait?
- On the tip of the nose
- On the nearest eye
- On the ear
- On the background, so everything looks sharp
Show the answer
On the nearest eye
Right. Viewers look at the eyes first, and a sharp nearer eye makes the whole portrait read as sharp. Tap it, or use eye-detect AF if your phone or camera has it.
LIGHT AND BACKGROUND
Soft light from the side-front, space behind
Faces look best in soft light from the side-front: a window with the person turned about 45 degrees to it, open shade outdoors, or golden hour. Avoid the overhead midday sun and the ceiling light straight above, which both put dark shadows under the eyes. A white wall, a sheet of paper or a reflector on the shadow side bounces some light back in. Behind the person, keep the background simple and a few metres away: more distance means more blur. On a camera, a slightly wide aperture of about f/2 to f/4 softens it further; on a phone, Portrait mode fakes it, so check the cut-out edges around hair and glasses.
Nima sits his grandmother by the living-room window, turned partly towards it, with the room behind her dim and three metres away. A white pillowcase on her lap bounces light up under her chin.
Small things that make a big difference
- Hold the camera around the person's eye level or slightly above; much lower than the chin exaggerates the chin and nostrils.
- Crop at mid-thigh, waist or chest, not exactly at the knees, elbows, wrists or ankles.
- Check behind their head for poles and bright spots before you press.
- Common mistakes: too wide and too close, harsh direct flash, focus on the nose or ear, a busy background.
Check yourself
For soft, flattering light, Sara should seat her friend with the bright window directly behind her.
Show the answer
False
False. With the window behind her, her face is in shadow and the window blows out. Turn her to face the window at roughly 45 degrees, so the light falls on her face from the side-front and shapes it.
Helping someone relax in front of the lens
- Ask first
Always with strangers, and with children ask a parent too. With friends, say what you're after.
- Keep talking
Silence behind a camera makes people freeze. Chat, joke, ask them something.
- Give small, specific directions
"Chin a little forward and down", "turn your shoulders a bit away from me". Not "act natural".
- Shoot a burst
Hold the shutter or use burst mode to catch a real expression and avoid blinks.
- Show them a good one early
Once they see they look good, they relax, and the next shots get better.
Check yourself
Mina is taking portraits of her cousin. Which choices help, and which hurt?
- Camera at her eye level
- Camera well below her chin
- A plain wall three metres behind her
- Cropping the frame exactly at her knees
- Standing under the ceiling light
- Shooting a burst while chatting with her
Show the answer
Helps: Camera at her eye level, A plain wall three metres behind her, Shooting a burst while chatting with her
Hurts: Camera well below her chin, Cropping the frame exactly at her knees, Standing under the ceiling light
Lesson recap
- Distance, not the lens, distorts a face: from about 30 cm the nose looks bigger.
- Step back to about 1.5 to 2 m, then fill the frame with a 2x or 3x lens, Portrait mode, or about 50 to 135 mm on a camera.
- Use soft light from the side-front, such as a window at about 45 degrees; avoid light straight from above.
- Focus on the nearest eye, and keep a simple background a few metres behind.
- Talk, give small directions, shoot a burst, and ask permission.