
Focus and depth of field
Only one distance is truly sharp; depth of field is how far the acceptably sharp zone stretches around it. Learn to put focus exactly where you want it and to make the background soft or crisp on purpose.
ONE DISTANCE
Sharp at one distance, acceptable around it
A lens focuses on one distance at a time: a flat slice through the scene, parallel to the sensor. Things a little nearer or farther still look acceptably sharp, and that zone is the depth of field (DoF). Beyond it, things blur gradually, not all at once. A shallow depth of field means a thin sharp zone and a soft background; a deep one means most of the scene looks sharp.
Focus on a friend 2 metres away and a flowerpot beside her is just as sharp. The trees 20 metres behind her may be soft, depending on the settings.
Check yourself
When a lens is focused at 2 metres, something at 2.2 metres can still look sharp in the photo.
Show the answer
True
True. Only 2 metres is exactly in focus, but the depth of field is a zone of acceptable sharpness around it. How far that zone stretches depends on the aperture, the distance and the lens.
THE FOUR DIALS
What makes the sharp zone thinner
Depth of field gets shallower, with more background blur, when you: use a wider aperture (a smaller f-number); get closer to the subject; use a longer focal length (zoom in, or switch to the 2x or 3x lens); and, for background blur specifically, put a bigger gap between the subject and the background. Do the opposite and it gets deeper. Sensor size matters too, which is why a phone's small sensor keeps almost everything sharp.
A flower at 30 cm, shot at f/2.8, with the garden far behind it: the background melts completely. The same flower at f/8 against a fence 20 cm behind it: the fence stays readable.
Check yourself
Which setup gives the most background blur?
- f/8, subject far away, a wall right behind the subject
- f/8, subject close, background far away
- f/1.8, subject close, background far away
- f/1.8, subject far away, a wall right behind the subject
Show the answer
f/1.8, subject close, background far away
Right. Wide aperture, a close subject and a distant background all push the same way: a thin sharp zone and a background far outside it.
Step through it
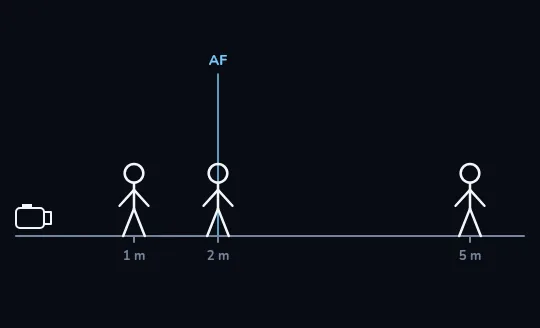
The lens focuses on one distance Seen from the side: a camera on the left and three figures standing 1, 2 and 5 metres away. The vertical line marked AF is where the lens is focused, on the figure 2 metres away. A lens focuses on one distance at a time.
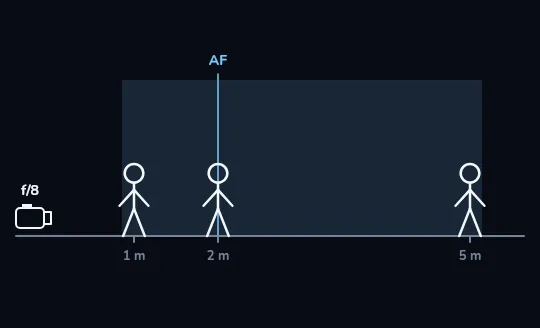
f/8: a deep sharp zone At f/8 the shaded band, the depth of field, stretches from about 1 metre to beyond 5 metres. All three figures stand inside it, so all three look sharp, even though the lens is still focused at 2 metres.
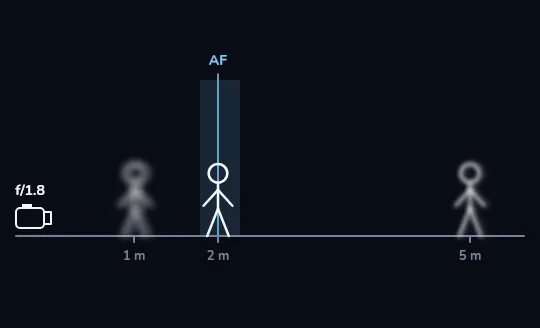
f/1.8: a thin slice around 2 metres Open up to f/1.8 and the band shrinks to a thin slice around 2 metres. The focused figure stays sharp, while the figures at 1 and 5 metres soften into blur.
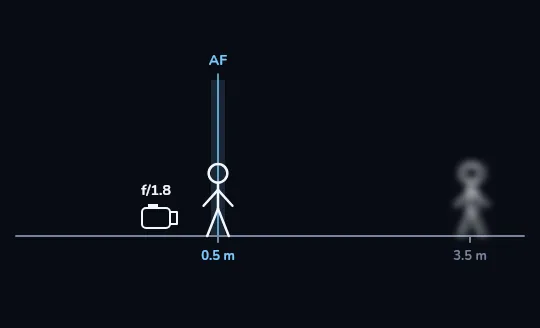
Move closer: the slice gets thinner still Still at f/1.8, the camera moves up to half a metre from the subject, and the figure that was 1 metre away drops out of the picture. Measured from the new spot, the subject is at 0.5 m and the back figure at 3.5 m. The sharp band is now a sliver and the back figure is even more blurred: getting closer makes the sharp zone thinner and the background softer.
Check yourself
Between the third and fourth frames the aperture stayed at f/1.8. What made the sharp band thinner and the back figure blurrier?
- The lens switched to a smaller f-number on its own
- The camera moved much closer to the subject
- The back figure walked further away
- The focus moved from the subject to the back figure
Show the answer
The camera moved much closer to the subject
Right. Nothing changed except the camera's distance to the subject, 2 metres down to 0.5. A closer subject alone is enough to thin the sharp zone and soften the background.
PUTTING FOCUS WHERE YOU WANT IT
Autofocus, tap and lock
Single AF (AF-S, or One-Shot on Canon) focuses once and locks: for still subjects. Continuous AF (AF-C, or AI Servo) keeps adjusting as the subject moves: for children, pets and sport. Most modern phones and cameras also detect faces and eyes. Phone: tap where you want focus; long-press for AE/AF lock so it stays there when you reframe. Camera: pick the focus point, or focus and recompose: half-press on the subject, keep holding, reframe, then press fully. That works for most shots, but at very wide apertures close up it can miss slightly. For people, focus on the nearest eye: if the eyes are sharp, the portrait reads as sharp.
Sara's friend sits at a slight angle to the camera. Sara taps on the eye nearest the lens, and even at f/1.8 the portrait feels crisp.
Check yourself
Which autofocus mode suits each subject?
- A cat asleep on the sofa
- A child on a swing
- An old building across the square
- A dog running towards you
- A friend sitting still for a portrait
- A cyclist racing past
Show the answer
Single AF (AF-S): A cat asleep on the sofa, An old building across the square, A friend sitting still for a portrait
Continuous AF (AF-C): A child on a swing, A dog running towards you, A cyclist racing past
WHEN IT GOES WRONG
Portrait mode, and the usual misses
Portrait mode on a phone measures depth and blurs the background in software. It's often convincing, but it can make mistakes around hair, glasses and the gaps between arms and body, so check the edges; many phones let you adjust the blur afterwards. The usual focus misses: the camera locked onto the background because the scene is busy or the subject is off-centre; the subject is closer than the lens's minimum focus distance, so nothing can be sharp; or the picture is "soft" because of shake (lesson 3), not focus at all.
Mina's Portrait mode photo looks great until she zooms in: a strand of hair has been blurred away along with the background. She lowers the blur strength in the edit and it looks natural again.
Check yourself
At a family gathering, Reza photographs eight people in two rows at f/2.8. The front row is sharp; the back row is blurry. What's the fix?
- Use a faster shutter speed
- Raise the ISO
- Move closer so the faces are bigger
- Use a narrower aperture, around f/5.6 to f/8, or step back a little
Show the answer
Use a narrower aperture, around f/5.6 to f/8, or step back a little
Right. At f/2.8 the sharp zone was too thin to hold both rows. Closing down to around f/5.6 to f/8, or stepping back, deepens it enough for everyone.
Check yourself
Nima frames his friend off to one side, and every time he adjusts the framing his phone refocuses on the busy wall behind her. What helps most?
- Tap on his friend and long-press for AE/AF lock, then reframe
- Turn on the grid lines
- Switch to the 0.5x ultra-wide lens
- Raise the exposure slider
Show the answer
Tap on his friend and long-press for AE/AF lock, then reframe
Right. Tapping tells the phone what matters, and the long-press lock keeps focus and exposure there while he moves the frame.
Lesson recap
- A lens focuses on one distance; depth of field is the zone of acceptable sharpness around it.
- Wider aperture, closer subject, longer focal length and a distant background all mean more background blur.
- The sharp zone usually reaches further behind the focus point than in front, roughly one-third to two-thirds.
- Single AF for still subjects, continuous AF for moving ones; for people, focus on the nearest eye.
- On a phone, tap and long-press for AE/AF lock. Check Portrait mode's edges around hair and glasses.