
ISO and the exposure triangle
ISO brightens the picture after the light is in, at the cost of grain. Learn how aperture, shutter speed and ISO trade stops with each other, and how to choose which one to give up.
ISO
How much the sensor's signal is amplified after the light has been collected. The usual steps are ISO 100, 200, 400, 800, 1600, 3200, and each doubling is one stop brighter. Unlike aperture and shutter speed, ISO doesn't let in any more light; it turns up the volume on the light you already have.
ISO 100 to ISO 400 is two doublings, 100 → 200 → 400, so the picture comes out two stops brighter from the same light.
Check yourself
Reza raises his ISO from 400 to 1600. How many stops brighter will the picture be?
- One stop
- Two stops: 400 → 800 → 1600
- Four stops, because 1600 is four times 400
- Twelve hundred stops, the difference between the numbers
Show the answer
Two stops: 400 → 800 → 1600
Right. Each doubling is one stop: 400 to 800 is one, 800 to 1600 is two. Four times the brightness, two stops.
THE COST
Noise: the grain that comes with high ISO
Raise the ISO and you get more noise: speckled grain, blotches of stray colour and a loss of fine detail, most visible in shadows and plain areas like sky or a wall. Strictly, most of it comes from too little light reaching the sensor, and ISO brightens it so you can see it. Small phone sensors get noisy sooner than larger camera sensors, so phones clean it up with processing, which can leave faces and textures looking smeary, almost like a watercolour.
A concert photo at ISO 3200 shows the singer clearly, but the dark stage behind is fizzing with coloured dots.
THE BIG PICTURE
The exposure triangle
Aperture, shutter speed and ISO all change brightness, all in stops, so they can stand in for each other. What makes them different is the side effect each one brings: aperture changes depth of field (how much is sharp), shutter speed changes motion blur and shake, ISO changes noise. Getting the brightness right is easy; the real skill is choosing which side effect you can live with for this particular photo.
For a moving child in a dim hallway you can't afford blur, and you can't open a phone's aperture any wider. The side effect you accept is grain: raise the ISO.
Check yourself
Match each control to the side effect it brings
Show the answer
- Aperture → How much of the scene is sharp front to back
- Shutter speed → Motion blur and camera shake
- ISO → Noise: grain and speckled colour
Step through it
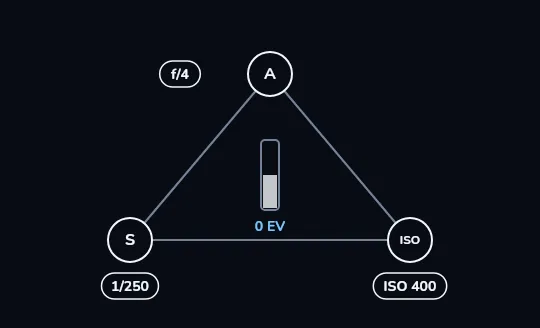
Three controls, one brightness The triangle's corners are the three controls: A, the aperture, at f/4; S, the shutter speed, at 1/250; and ISO at 400. The bar in the middle shows the brightness they add up to, 0 EV: a correct exposure.
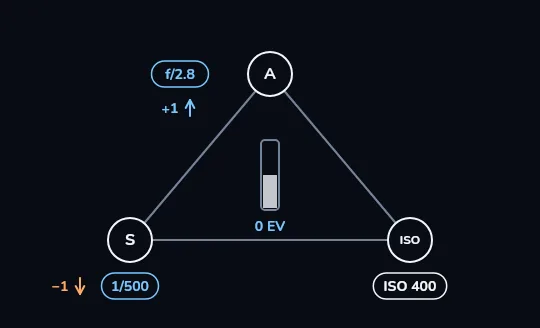
Open one stop, shorten one stop Open the aperture one stop to f/2.8, marked +1, and halve the time to 1/500, marked −1. One stop gained and one given back, so the bar stays at 0 EV: the same brightness, now with a blurrier background and a faster shutter.
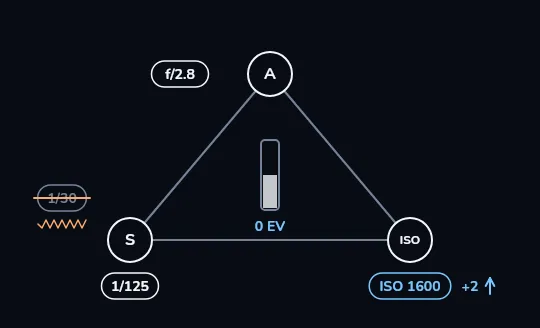
In a dim room, ISO pays for the speed Now move into a dim room, keeping f/2.8. At ISO 400 you'd need 1/30, too slow to hold steady, so it's struck out with a shake squiggle. Raise ISO two stops to 1600 instead, and the shutter can stay at 1/125, two stops faster than 1/30, with the bar still at 0 EV.
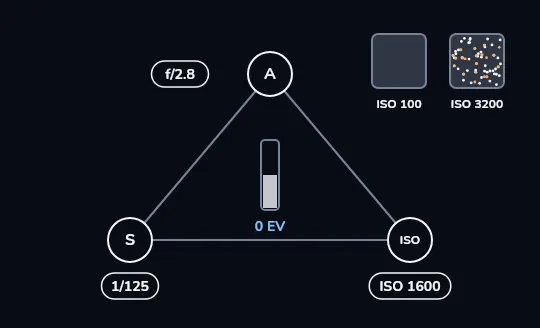
The price of ISO: noise Two small patches of the same plain surface appear beside the triangle. At ISO 100 it's smooth; at ISO 3200 it's covered in speckles. That's the price of raising ISO: more grain and stray colour as the number goes up, most visible in shadows and flat areas.
Check yourself
Sara has a correct exposure at f/4, 1/250, ISO 400. She switches to f/2.8 for more background blur and keeps ISO 400. Which shutter speed keeps the same brightness?
- 1/125
- 1/250
- 1/1000
- 1/500
Show the answer
1/500
Right. f/4 to f/2.8 lets in one stop more light, so she gives one stop back by halving the time: 1/250 to 1/500. Exactly the move you watched in the second frame.
Start:          f/4    1/250   ISO 400   → 0 EV

Option A:  aperture +1 → f/2.8
           shutter  −1 → 1/500

Option B:  shutter  −1 → 1/500
ISO +1 → ISO 800f/4 1/250 ISO 400 same brightness
f/2.8 1/500 ISO 400 same brightness, softer background
f/4 1/500 ISO 800 same brightness, a little more grainCount in stops. Move one control up by some number of stops and another down by the same number, and the brightness doesn't change. Only the side effects do.
Check yourself
Mina's photos at an indoor birthday party, taken at ISO 100, all come out blurred from shake. What's the better choice?
- Raise the ISO, for example to 1600, so the shutter can be fast enough; some grain beats blur
- Keep ISO 100 and use an even slower shutter to let in more light
- Keep ISO 100 and brighten the blurred photos later in an app
- Switch the flash off and wait for the room to get brighter
Show the answer
Raise the ISO, for example to 1600, so the shutter can be fast enough; some grain beats blur
Right. At ISO 100 the camera had to use a long shutter time to get enough light, which is where the shake came from. Raising ISO a few stops lets the shutter speed up; a little grain is far better than a blurred face.
HOW TO DECIDE
Start with what matters most
Moving subject? Choose the shutter speed first. Want a soft background, or everything sharp? Choose the aperture first. Then use the lowest ISO that gets you there. The modes follow the same logic: P picks both aperture and shutter for you; A/Av lets you pick the aperture; S/Tv lets you pick the shutter; M lets you pick all three, and a meter shows ± how far off you are. Auto ISO with a maximum set, say 3200, is a useful everyday partner for M or A. Phone Pro mode usually offers ISO and S (shutter) only, with a ± meter, because the aperture is fixed.
For his son's football match, Nima uses S mode at 1/1000 with Auto ISO capped at 3200: the camera finds the aperture and ISO, and every kick comes out frozen.
Check yourself
Reza left his camera at ISO 3200 after last night's concert. That's harmless for today's sunny beach photos, since the camera will simply pick a faster shutter.
Show the answer
False
False. Every beach photo will carry needless grain, and in very bright sun the camera may even run out of fast enough shutter speeds and overexpose. Check your ISO at the start of every outing; in daylight, ISO 100 to 200 is usually plenty.
Lesson recap
- ISO amplifies the signal; each doubling (100, 200, 400 ...) is one stop brighter.
- Its cost is noise, grain and stray colour, most visible in shadows and plain areas.
- Aperture, shutter speed and ISO all move brightness in stops; their side effects are depth of field, blur and noise.
- Equivalent exposures: move one control up and another down by the same number of stops.
- Choose the control that matters most first, then the lowest ISO that works. Some grain beats a blurred photo.